
Top 10 Compound Wall Lights for Outdoor Spaces?

A compound wall does more than mark a boundary. At dusk, it frames the entrance, guides visitors, and can leave steps or gates hidden in shadow. The right Compound Wall Lights balance visibility with a welcoming appearance. Yet choosing by appearance alone is a common mistake. A bright fixture can create glare, while a poorly sealed one may struggle with rain and dust. Small details matter.

The U.S. Department of Energy reports that residential LEDs use at least 75% less energy and can last up to 25 times longer than incandescent lighting. That comparison is useful, but it does not guarantee that every LED fixture performs equally well outdoors. Check the product’s weather rating, light direction, color temperature, and installation requirements. DarkSky International’s outdoor-lighting guidance also emphasizes using light only where needed and directing it downward. A practical test is simple: picture the wall, gate, and nearby path after dark—not just the fixture in a product photo. Some designs look striking online but may feel harsh at home. This guide reviews ten options for different wall styles, budgets, and lighting needs, while weighing durability, beam control, and everyday upkeep. No single model suits every property. The best choice is the one that makes the entrance easier to use without turning the whole yard into a spotlight.
Top 10 Compound Wall Lights for Outdoor Spaces?

Compound Wall Lights: Definition, Materials, and Outdoor Applications

Compound wall lights are outdoor fixtures mounted on boundary walls to illuminate entrances, walkways, and property edges. They improve visibility and help people identify gates after dark. Unlike tall posts, wall-mounted fittings keep light close to the route and can reduce clutter in small yards.

Common materials include powder-coated aluminum, stainless steel, galvanized steel, and copper. Aluminum is lightweight, while stainless steel can resist corrosion when its grade and finish suit the local climate. Copper develops a changing surface patina. Lenses are often glass or impact-resistant polycarbonate; each handles weather and knocks differently. Check drainage, too. Look for sealed joints and an outdoor suitability rating appropriate to rain and dust exposure.

At gates, downward-facing fixtures can light keyholes and steps without shining directly into visitors’ eyes. Along a driveway, evenly spaced lights help reveal changes in paving; gaps can leave dark patches. Glare matters. For coastal or damp locations, inspect finishes and fasteners regularly, since small chips may expose vulnerable metal. Warm light often feels comfortable near seating, while a neutral tone can make path edges easier to distinguish. Solar models avoid wiring, but shade and short winter days can reduce their runtime. Even a careful layout may leave one corner dim, so check it after installation rather than assuming the drawing tells the whole story.

Outdoor Durability Benchmarks: IEC 60529 IP65 and Corrosion Resistance

For compound wall lights, IP65 is a useful outdoor benchmark, not a promise of unlimited weather protection. Under IEC 60529, the first “6” means dust-tight; the second “5” indicates protection against water jets from any direction. Rain driven sideways across a boundary wall is a realistic test. Yet IP65 says nothing about corrosion, UV exposure, or years of temperature swings. A sealed fitting can still develop rust around screws or mounting plates.

Corrosion deserves attention. NACE International’s 2016 IMPACT study estimated global corrosion costs at US$2.5 trillion annually, about 3.4% of global GDP. That figure covers many industries, not wall lights specifically, but it shows why material choice matters. ISO 9223 classifies atmospheric corrosivity using environmental conditions and corrosion rates. Coastal air, road salts, and damp, shaded walls can be especially demanding. Even a good coating may be scratched during installation.

Tips: Check that the IP65 rating applies to the complete assembled fitting, including cable entries. Look for corrosion-resistant fasteners and a clear coating specification. Rinse salt deposits periodically, and inspect joints after the first wet season. Small details matter.

One limitation is easy to overlook: laboratory water-jet tests do not reproduce years of wind, grit, and maintenance neglect. Review the stated test conditions, then match materials to the actual site. A sheltered inland wall and a sea-facing wall are not equivalent.

Top 10 Compound Wall Light IP Benchmarks for Outdoor Spaces

IEC 60529 ingress-protection classifications: dust protection and water protection digits.

The chart compares IP20, IP23, IP44, IP54, IP55, IP65, IP66, IP67, IP68 and IP69. The digits are classification levels, not linear performance scores. IP65 means dust-tight and protection against water jets; higher water digits describe different test conditions, not a simple upgrade for every installation.

Corrosion resistance is separate from the IEC 60529 IP rating. Check the luminaire’s material, finish and documented corrosion-test results for the intended outdoor environment. Reference: IEC 60529.

Top 10 Fixture Types Compared by Beam Pattern, Mounting, and Light Source

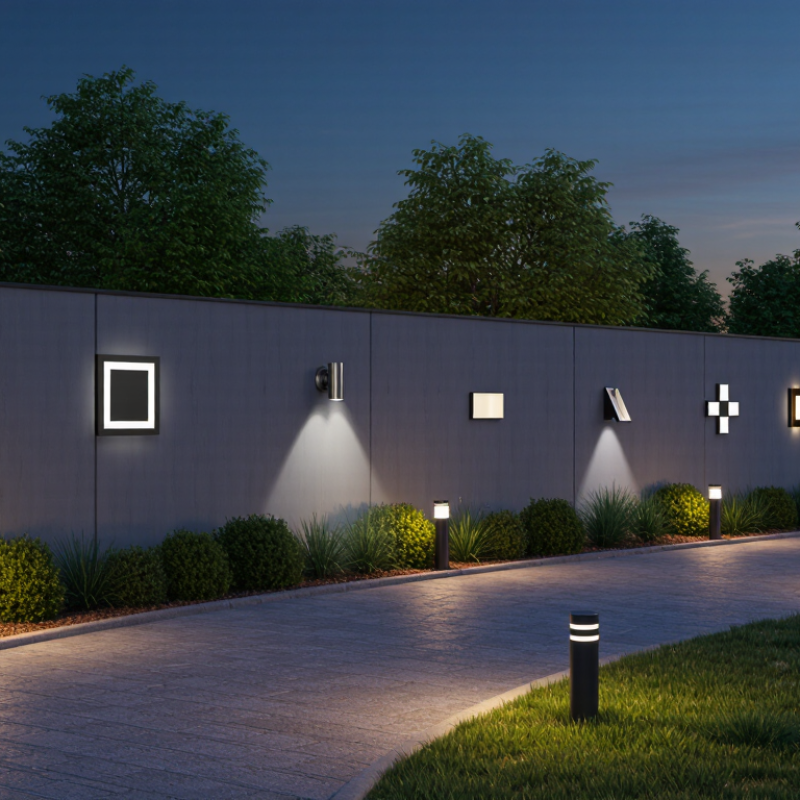
Top 10 compound wall lights differ most in how they spread light and attach to a wall. Wall lanterns create a broad, decorative glow; up-and-down sconces cast two distinct beams. Shielded downlights direct light toward paths, while bulkhead fixtures spread a softer, wider pool. Recessed step lights sit low and reduce glare. Corner-mounted lights cover two sides. Cylinder sconces shape narrow beams, and adjustable spot heads let you aim at gates or planting. Linear wall bars give even coverage along long walls. Solar-integrated fixtures avoid wiring, but output can vary with shade and season. Light sources include replaceable LED lamps and integrated LEDs; check whether replacement parts are available.

Mounting height changes the result. A narrow beam can leave dark patches if fixtures sit too far apart, while a broad beam may spill into nearby windows. Match the beam to the task, then check the fixture’s outdoor rating and wall-box compatibility. Warm light often feels gentler near seating, though color preference is personal. One detail is easy to overlook: textured brick can break up an otherwise smooth beam.

Tips: Mark fixture positions with tape and test spacing after dark. Compare beam spread on the actual wall, not just in a product diagram. Reserve enough clearance for maintenance.

Lighting Metrics Explained: Lumens, 2700–4000 K CCT, and CRI ≥80

Lumens describe how much visible light a wall fixture produces, not how far it throws light. The U.S. Department of Energy’s solid-state lighting guidance separates light output from color appearance, a distinction worth keeping in mind when comparing compound wall lights. A modest lumen output can feel bright beside a pale wall, yet disappear against dark brick. Check the beam pattern, too. A narrow beam may leave the gate bright and the path oddly dim.

CCT describes whether light looks warm or cool. Around 2700 K, light usually appears warm and welcoming; near 4000 K, it looks cooler and clearer. For a home entrance, 2700–3000 K often softens stone and timber, while 3000–4000 K can help reveal steps and edges. The DOE identifies CCT as a way to describe a source’s color appearance, not its brightness. Small distinction. It matters.

CRI indicates how faithfully a light shows colors compared with a reference source. The International Commission on Illumination’s CIE 13.3 method sets out color-rendering measurement; CRI ≥80 is a practical baseline for seeing plants, paint, and parcel labels naturally. Still, one number cannot capture every color well. I have found that samples can look flatter under a high-CRI lamp than expected, especially beside greenery. Check the actual fixture outdoors, if possible, and avoid aiming light directly into approaching eyes.

Top 10 Compound Wall Lights for Outdoor Spaces? — Lighting Metrics Explained: Lumens, 2700–4000 K CCT, and CRI ≥80

Compare these ten common, brand-neutral fixture types as a planning guide for compound walls and outdoor boundaries. The lumen figures are indicative ranges for a single light, not universal product specifications; the right output depends on mounting height, spacing, wall finish, beam direction, and the amount of light needed.

Outdoor compound-wall light types and practical lighting benchmarks
# Light type Typical output per fixture Suggested CCT Color rendering Distribution / use Outdoor protection to consider
1 Shielded downward wall light 300–700 lm 2700–3000 K CRI ≥80 Downward pool of light for a wall-side path; shielding helps limit glare and upward spill. Choose an ingress-protection rating suited to the fixture’s exposure; IP44 is splash-resistant, while more exposed locations may need higher protection.
2 Up-and-down wall light 400–900 lm 2700–3000 K CRI ≥80 Decorative light above and below the fitting; aim and position it to avoid shining into neighboring properties. Check the rating for rain and dust exposure, and confirm that the light’s openings and installation orientation match the manufacturer’s instructions.
3 Wide-beam wall washer 600–1200 lm 3000–3500 K CRI ≥80 Spreads light across a broader wall area; spacing and setback affect whether the wall looks evenly lit. For locations exposed to water jets or heavy dust, consider a suitably rated sealed fixture, such as IP65, where appropriate.
4 Narrow-beam accent light 200–500 lm 2700–3000 K CRI ≥80 Highlights pillars, stonework, or architectural details; not usually a substitute for general path lighting. Use an outdoor-rated fitting appropriate to its mounting position and direct exposure.
5 Opal-diffuser wall lantern 400–800 lm 2700–3000 K CRI ≥80 Soft, broadly distributed light near entrances and gates; diffuser size and brightness affect perceived glare. Check seals, material suitability, and the stated IP rating for the site’s weather conditions.
6 Cut-off security wall light 800–1500 lm 3000–4000 K CRI ≥80 Higher-output option for boundary areas; a shielded, well-aimed beam can improve visibility while controlling spill. For exposed installations, verify the complete fixture’s dust and water protection; IP65 indicates dust-tight construction and protection against water jets under test conditions.
7 Motion-sensor wall light 500–1200 lm when on 3000–4000 K CRI ≥80 Provides light when movement is detected; sensor range, detection angle, and timeout are installation-dependent. Confirm that both the light and sensor are rated for their actual outdoor exposure.
8 Recessed wall step light 50–200 lm 2700–3000 K CRI ≥80 Low-level guidance for steps or changes in level; position to illuminate walking surfaces without direct eye glare. Recessed fittings can collect water if installed incorrectly; follow drainage, sealing, and mounting instructions.
9 Linear wall light 300–900 lm per fitting 3000–3500 K CRI ≥80 Continuous or near-continuous visual line for modern boundary walls; output depends on fitting length and LED efficiency. Check the rating for the whole installed fitting, including end caps, joints, and cable entries.
10 Solar wall light 100–600 lm, mode-dependent 2700–4000 K CRI ≥80 where specified Useful where wiring is impractical; runtime and brightness depend on sunlight, battery capacity, temperature, and operating mode. Verify the stated weather-protection rating and allow for reduced charging in shade or during overcast weather.

Metric guide: Lumens (lm) measure the total light output from a source; they do not by themselves describe how brightly a particular wall or path will be lit. CCT, expressed in kelvin (K), describes the appearance of white light: lower values such as 2700 K look warmer, while values near 4000 K look cooler. CRI indicates how faithfully colors appear under a light source; CRI ≥80 is a common baseline for outdoor general lighting. IP ratings describe tested protection against dust and water ingress, not resistance to every installation condition. Confirm local electrical requirements, mounting instructions, and site-specific exposure before choosing a fixture.

Safe Installation: Voltage, Grounding, and Local Electrical-Code Compliance

Compound wall lights can brighten a path, but safe installation starts with the electrical supply. Check the fixture label and instructions before connecting wires. The rated voltage must match the circuit. Low-voltage lights need a compatible transformer; never connect them directly to household voltage. Switch off the breaker, then use a suitable tester to confirm the wires are de-energized. A switch position alone is not proof. Do not guess.

Outdoor exposure matters, too. Choose a fixture and electrical box rated for the location, especially where rain can reach the wall. Connect the grounding conductor to the fixture’s grounding point and the circuit’s ground. Metal mounting hardware is not a substitute. Small details matter. If the cable has no clear ground, stop and ask a qualified electrician rather than improvising.

Local electrical codes may specify GFCI protection, approved boxes, wire methods, clearances, or permits. Requirements differ by location and installation type, so check with the local building department before work begins. Keep wire connections inside a listed, weather-suitable enclosure, and seal the wall opening as directed by the fixture instructions. I have seen tidy-looking installations fail because water found one small gap. A final check is worth the extra time: confirm secure mounting, intact insulation, and proper operation before leaving the light on.

Go to Top